How to Install a Towel Bar: The Complete Guide for Drywall and Tile
Originally published October 2025, Updated July 2026
Transparency Note: We independently select these products based on research and user reviews. If you buy something through our links, we may earn a commission.
In my years as a Red Seal carpenter, the towel bar is one of the most common bathroom repairs I see. Not a difficult installation. A failed one. Someone bought a bar they liked, drilled into the drywall in between studs, used the small plastic anchors that came in the kit, and within six months of wet towels being pulled off daily the whole assembly pulled out of the wall leaving two ragged holes and a patch job.
The bar itself was fine. The anchor choice was wrong for the load. A wet bath towel weighs roughly one kilogram. Four wet towels on a bar that gets grabbed firmly twice a day generates cumulative shear force that the standard included plastic anchor cannot handle long term. This is the conversation most installation guides skip because they assume a towel bar is a simple job that does not need engineering context. It is a simple job, but only if you understand the three different scenarios and what each one requires.
Here is the complete guide covering drywall into a stud, drywall without a stud, and tile, which is the scenario most people face in a bathroom and the one most tutorials get wrong.
Before You Start: The Three Questions That Determine Your Approach
Answer these three questions before you pick up a drill and you will know exactly what you need and what method to follow.
What surface are you drilling into? Drywall, tile over drywall, or tile over cement board are three different scenarios. Drywall requires a stud or a quality toggle anchor. Tile requires a diamond-tipped drill bit and a completely different drilling technique. Mixing these up is how you crack tile or strip out a hole in drywall that will not hold.
Is there a stud where you want to mount? Studs are typically spaced 16 inches apart in residential construction. Hitting both studs with both brackets is the ideal scenario and produces a mount that will outlast the towel bar itself. If your bracket spacing does not line up with studs, the anchor choice becomes the critical decision.
What height and location? The standard towel bar height is 48 to 54 inches from the floor for adults, which keeps towels clear of the floor and within comfortable reach. For a bathroom used primarily by children, lower is better. Position the bar near the shower or bath where it will be used, on a wall clear of door swing, with enough clearance that a hanging towel does not touch any other surface.
What You Need
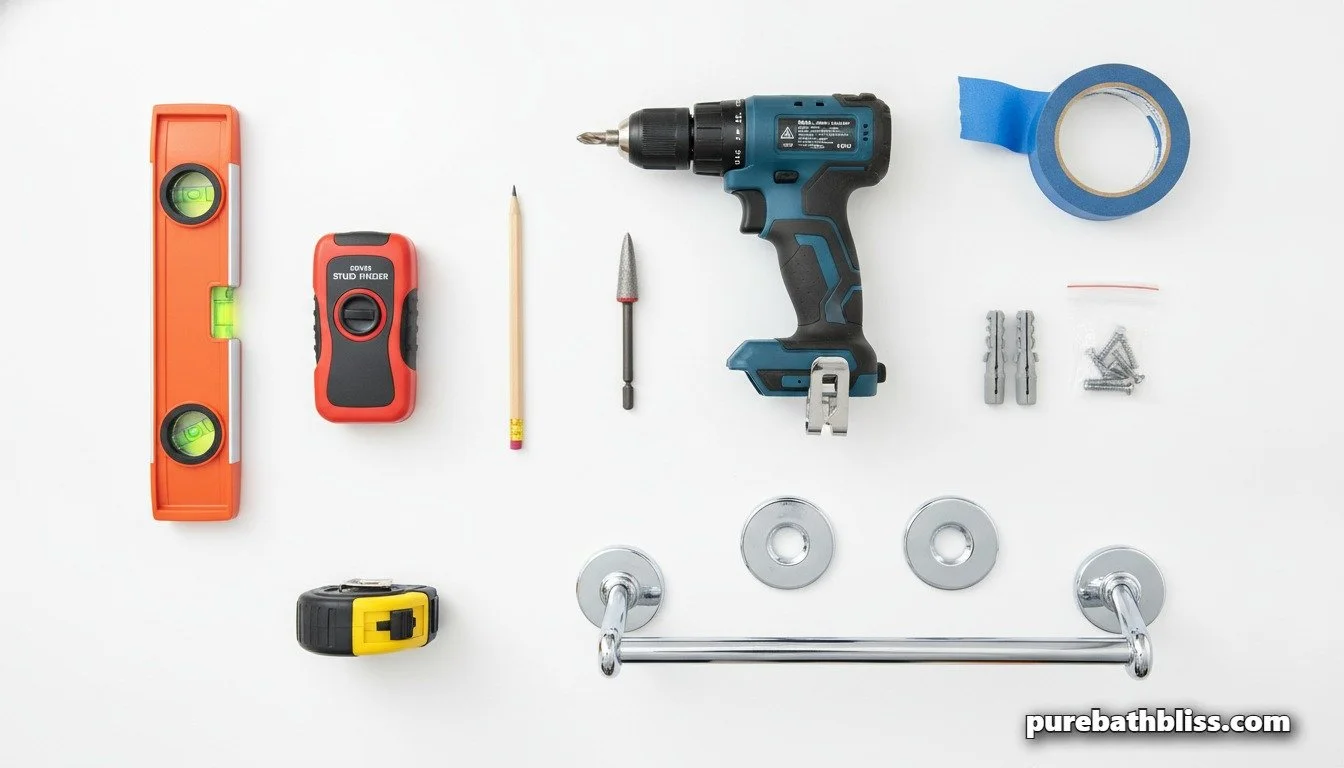
A cordless drill with a standard 1/8 inch bit for drywall and stud work
A diamond-tipped tile drill bit if you are drilling into tile — a standard bit will skate across the glazed surface and shatter it
A stud finder — worth the investment for any bathroom project, not just this one
A torpedo level — a crooked towel bar is the most visually obvious installation mistake in a bathroom
A tape measure and pencil
Blue painter's tape — for marking tile drilling locations and preventing drill bit skate
The right anchors — covered in detail below by surface type
The towel bar kit — your brackets, screws, bar, and set screw hex key should all be in the box
On the towel bar itself: buy the best quality bar your budget allows and choose a finish that matches your existing fixtures. The most common complaint about towel bar replacements is that the new finish does not match the taps, toilet paper holder, or other hardware in the room. Check the finish code on your existing fixtures before buying. Most major brands, Moen, Delta, Kohler, and Amerock, use consistent finish codes across their ranges so matching is straightforward if you buy within the same family.
A quality 24-inch towel bar in brushed nickel is the most versatile choice for a modern bathroom and resists the water spotting that chrome shows immediately. For a bathroom with matte black hardware, matte black towel bars have become the most popular finish in 2025 and 2026 and are widely available across all major brands.
Scenario 1: Drywall Into a Stud
This is the strongest possible mount and the one to aim for whenever the stud spacing allows. Use your stud finder to locate the studs in the area where you want to mount the bar. Mark each stud with a small pencil mark at your target height. If both bracket positions land on or very close to studs, you are in the best possible scenario.
Method:
Hold the first bracket against the wall at your target height and mark the screw hole locations with a pencil. Use the torpedo level to confirm the mark is plumb before drilling anything.
Drill a pilot hole at each marked location using a bit slightly smaller than your screw diameter. The pilot hole prevents the drywall paper from tearing and stops the screw from splitting the stud if it is close to the edge.
Drive the screws through the bracket base into the stud. They should be snug and firm, not stripped. Stop when the bracket base is flush against the wall without any gap.
Before fixing the second bracket, measure the distance from the first bracket to where the second bracket needs to sit using the towel bar itself as a guide. Lay the bar across the first mounted bracket and mark the second bracket position from the bar's actual dimensions rather than from the instructions, which can sometimes be slightly off for your specific wall.
Check level across both bracket positions before drilling the second set of holes. A one-millimetre error at the marking stage becomes a visually obvious droop when the bar is hanging.
Scenario 2: Drywall Without a Stud
This is the scenario that produces the most failed towel bar installations and it comes down entirely to anchor choice. The small white plastic plugs included in most towel bar kits are rated for light loads on flat walls. They are not rated for the shear load of wet towels being pulled off a bar daily in a humid bathroom environment. Do not use them if you are installing into drywall without hitting a stud.
The anchor you want is a toggle bolt or a snap toggle anchor. These work by passing through the drywall and expanding behind it, distributing the load across a wider area of the drywall panel rather than relying on the grip of a small plug in a hole. A properly installed 1/4 inch toggle bolt in half-inch drywall is rated for 50 to 100 pounds in shear, which is far more than any towel bar will ever need.
Method for toggle bolt installation:
Mark your bracket positions and check level exactly as in Scenario 1.
Drill the hole size specified for your toggle bolt, typically 1/2 inch for a standard toggle, which is larger than a pilot hole. The toggle wings need to pass through the hole.
Thread the bracket screw through the bracket base and through the toggle wings before inserting into the wall. Fold the wings flat, push them through the hole, and pull back firmly so the wings expand flat against the back of the drywall.
Hold the bracket flat against the wall while tightening the screw. The toggle wing on the back grips the drywall as you tighten, pulling the bracket firmly against the wall surface. Stop when snug, not when stripped.
Test the bracket firmly with your hand before mounting the bar. It should feel completely solid with no movement at all. If there is any play, the anchor has not seated correctly and needs to be redone.
Scenario 3: Tile
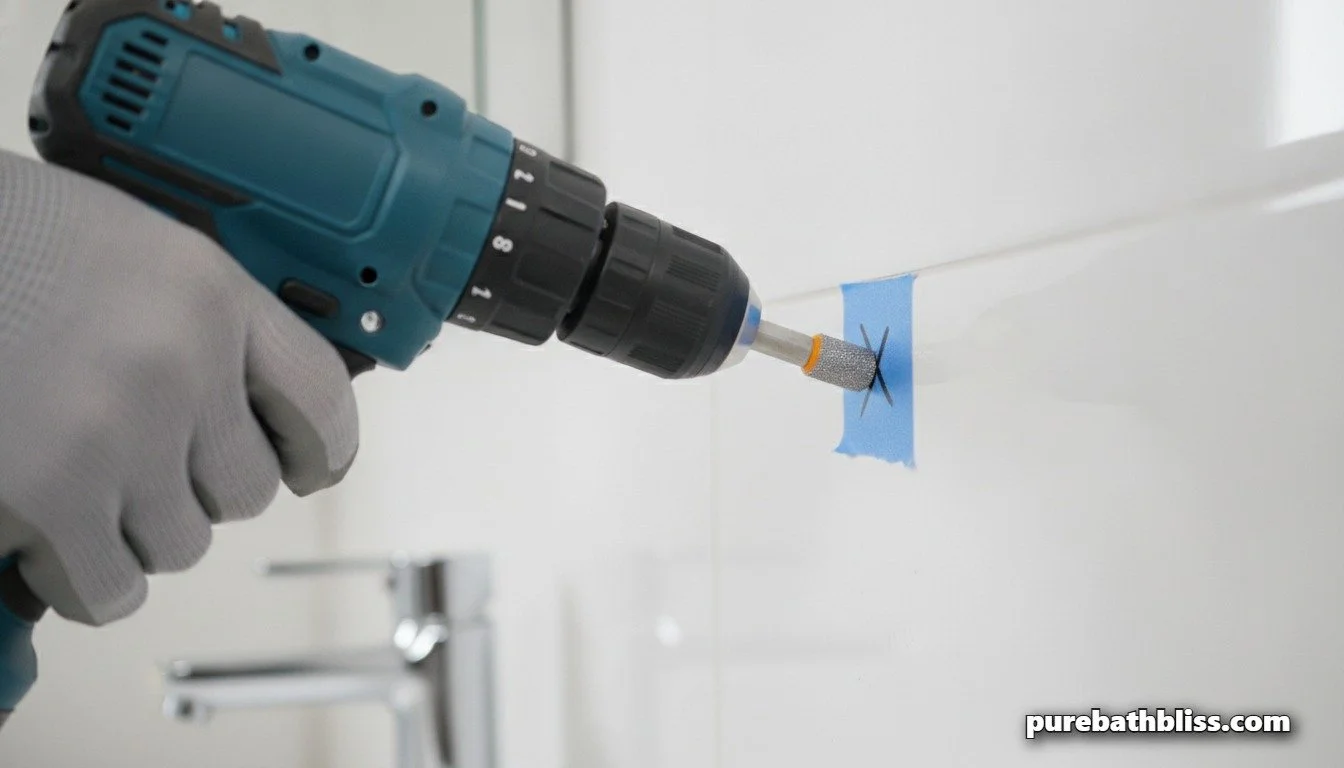
Tile installation requires a different approach at every step. The glazed surface of ceramic and porcelain tile is hard and slippery, which means a standard drill bit will skate across it without biting and potentially crack the tile from the vibration before it penetrates at all. A diamond-tipped drill bit is not optional for this scenario. It is the only bit designed to grind through the glaze without slipping.
Method for tile installation:
Plan your hole positions carefully. Drill through the tile body rather than through the grout line wherever possible. The tile is stronger and provides better anchor grip than grout, which is porous and brittle. Measure twice to confirm your bracket marks land on tile rather than on grout joints before you drill anything.
Apply a small piece of painter's tape over each drilling mark. This gives the drill bit something to bite into at the start of the hole rather than skating across the glaze. Mark through the tape with a pencil or marker so your target point is still visible.
Start drilling at very low speed with the diamond bit, almost no pressure, letting the bit grind its way through the glaze. Do not push. Let the bit do the work. Once through the glaze the bit moves more freely and you can increase speed slightly. Keep the bit cool by periodically applying a few drops of water to the drilling point. Overheating cracks tile.
Once through the tile you will hit either the adhesive layer, cement board, or drywall behind it. Standard wall anchors work fine for the substrate behind the tile. If you hit a stud behind the tile, you can drive a screw directly. If you hit drywall or cement board, use a toggle bolt or a tile-specific wall anchor rated for wet area use.
Apply a small bead of clear silicone sealant around the bracket base before pressing it against the tile and driving the screws. In a wet area, water can penetrate behind an unsealed bracket base and cause the tile adhesive to fail over time. The silicone seal prevents this. Wipe any excess silicone from the tile face immediately with a damp cloth before it cures.
One tile-specific warning worth stating clearly: never attempt to install a towel bar through natural stone, marble, travertine, or slate tile without a professional diamond core drill and experience with these materials. Natural stone is significantly more prone to cracking from vibration than ceramic or porcelain, and a crack in a large format marble tile is an expensive and often irreparable mistake. If your bathroom has natural stone tile, consider a freestanding towel stand or an adhesive-mounted bar rated for the load rather than drilling into the stone.
Mounting the Bar: The Final Steps
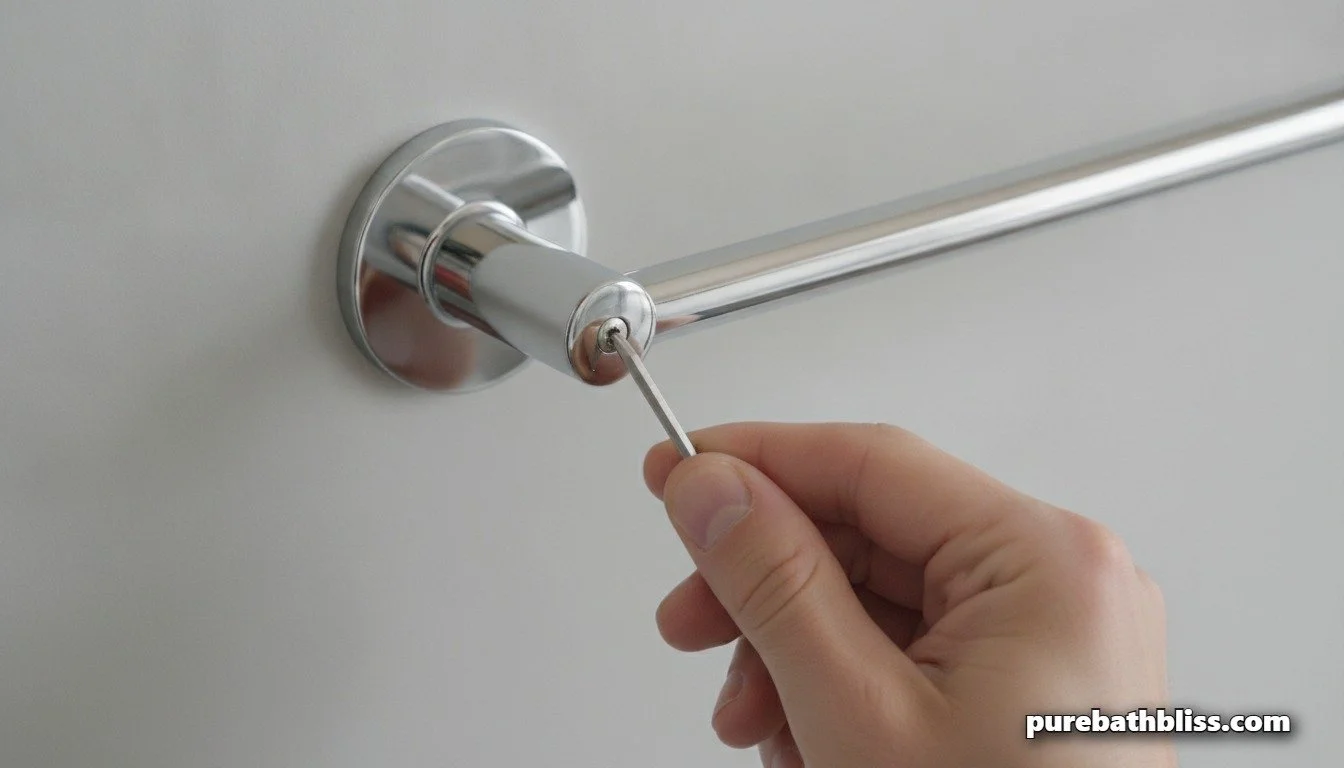
Once both brackets are mounted firmly and level, the bar installation itself takes about two minutes. Slide or snap the bar ends into the bracket cups depending on your specific design. Most bars are then secured with a small set screw on the underside of each bracket, tightened with the hex key included in the kit. Tighten until snug but do not strip the small set screw, they are typically softer metal than the bracket itself.
Before considering it done, test the bar firmly with both hands. Grab it and pull outward with reasonable force, the kind of force a child would apply pulling a towel off quickly. Nothing should move. No bracket flex, no wall movement, no bar shift. If you feel any play at all, the anchor has not seated properly and needs to be addressed before you hang towels on it. A bar that feels slightly loose on installation will be visibly loose within three months of daily use.
If the bracket cover plates are decorative pieces that snap over the mounted brackets rather than being part of the bracket itself, snap those into place last. They hide the screws and give the installation its finished appearance. Some covers require a gentle tap with the heel of your hand to seat fully. Do not use a hammer.
Quick Reference: Surface Type and Anchor Guide
| Surface | Drill Bit | Best Anchor | Avoid | Strength Rating |
|---|---|---|---|---|
| Drywall into stud | Standard 1/8 inch | No anchor needed — screw directly into stud | Overtightening which strips the stud | Excellent — strongest possible mount |
| Drywall between studs | 1/2 inch for toggle bolt | Toggle bolt or snap toggle anchor | Small plastic plugs included in kit — not rated for shear load | Very good if correct anchor used |
| Ceramic or porcelain tile | Diamond-tipped tile bit — mandatory | Tile-rated wall anchor or toggle bolt through substrate. Silicone seal around bracket base. | Standard drill bits — will skate and crack tile. High speed drilling — overheats and cracks tile. | Good when done correctly |
| Natural stone (marble, travertine, slate) | Professional diamond core drill only | Professional installation recommended | DIY drilling — high crack risk on large format stone. Vibration from standard drilling cracks stone. | High risk — consider adhesive alternative |
| Cement board (behind tile) | Masonry bit or diamond bit | Screw directly or use masonry anchor rated for wet area | Toggle bolt — cement board is too thick for standard toggles to deploy correctly | Very good |
Height, Placement, and the Multi-Bar Strategy
The standard installation height of 48 to 54 inches from the floor suits most adults. If you are installing in a bathroom used primarily by children under ten, 36 to 40 inches works better and keeps the towels within their reach without requiring them to tip-toe. For a family bathroom used by a range of ages, installing two bars at different heights is the most practical solution and considerably cheaper than a heated towel rack or other complex storage.
The placement relative to the shower or bath matters more than most guides acknowledge. The ideal position is on the wall directly outside the shower entry, at arm's reach without stepping out of the shower. This means the person reaching for their towel does not drip across the floor, and the towel is not hanging in the steam zone where it cannot dry between uses. A towel that hangs permanently in the steam zone of a shower, even on a perfectly installed bar, will develop that persistent damp smell within a few weeks regardless of how often it is washed. Placement solves this problem more effectively than any amount of washing.
Once your bar is installed, getting the most out of your towel storage is the next step. Our guide to the spa fold towel technique covers the two hotel folding methods that make a towel bar display look deliberately styled rather than just functional. And if you have older towels that no longer feel or look their best, our guide to repurposing old bath towels covers what to do with them rather than sending them to landfill.