Why Your Bathroom Mirror is "Desilvering" (and How to Fix It)
If you’ve noticed dark, jagged spots creeping in from the edges of your bathroom mirror, you aren't alone. In the industry, we call this "desilvering" or "mirror rot." For a homeowner, it’s one of those small frustrations that can make an otherwise pristine bathroom feel dated and neglected.
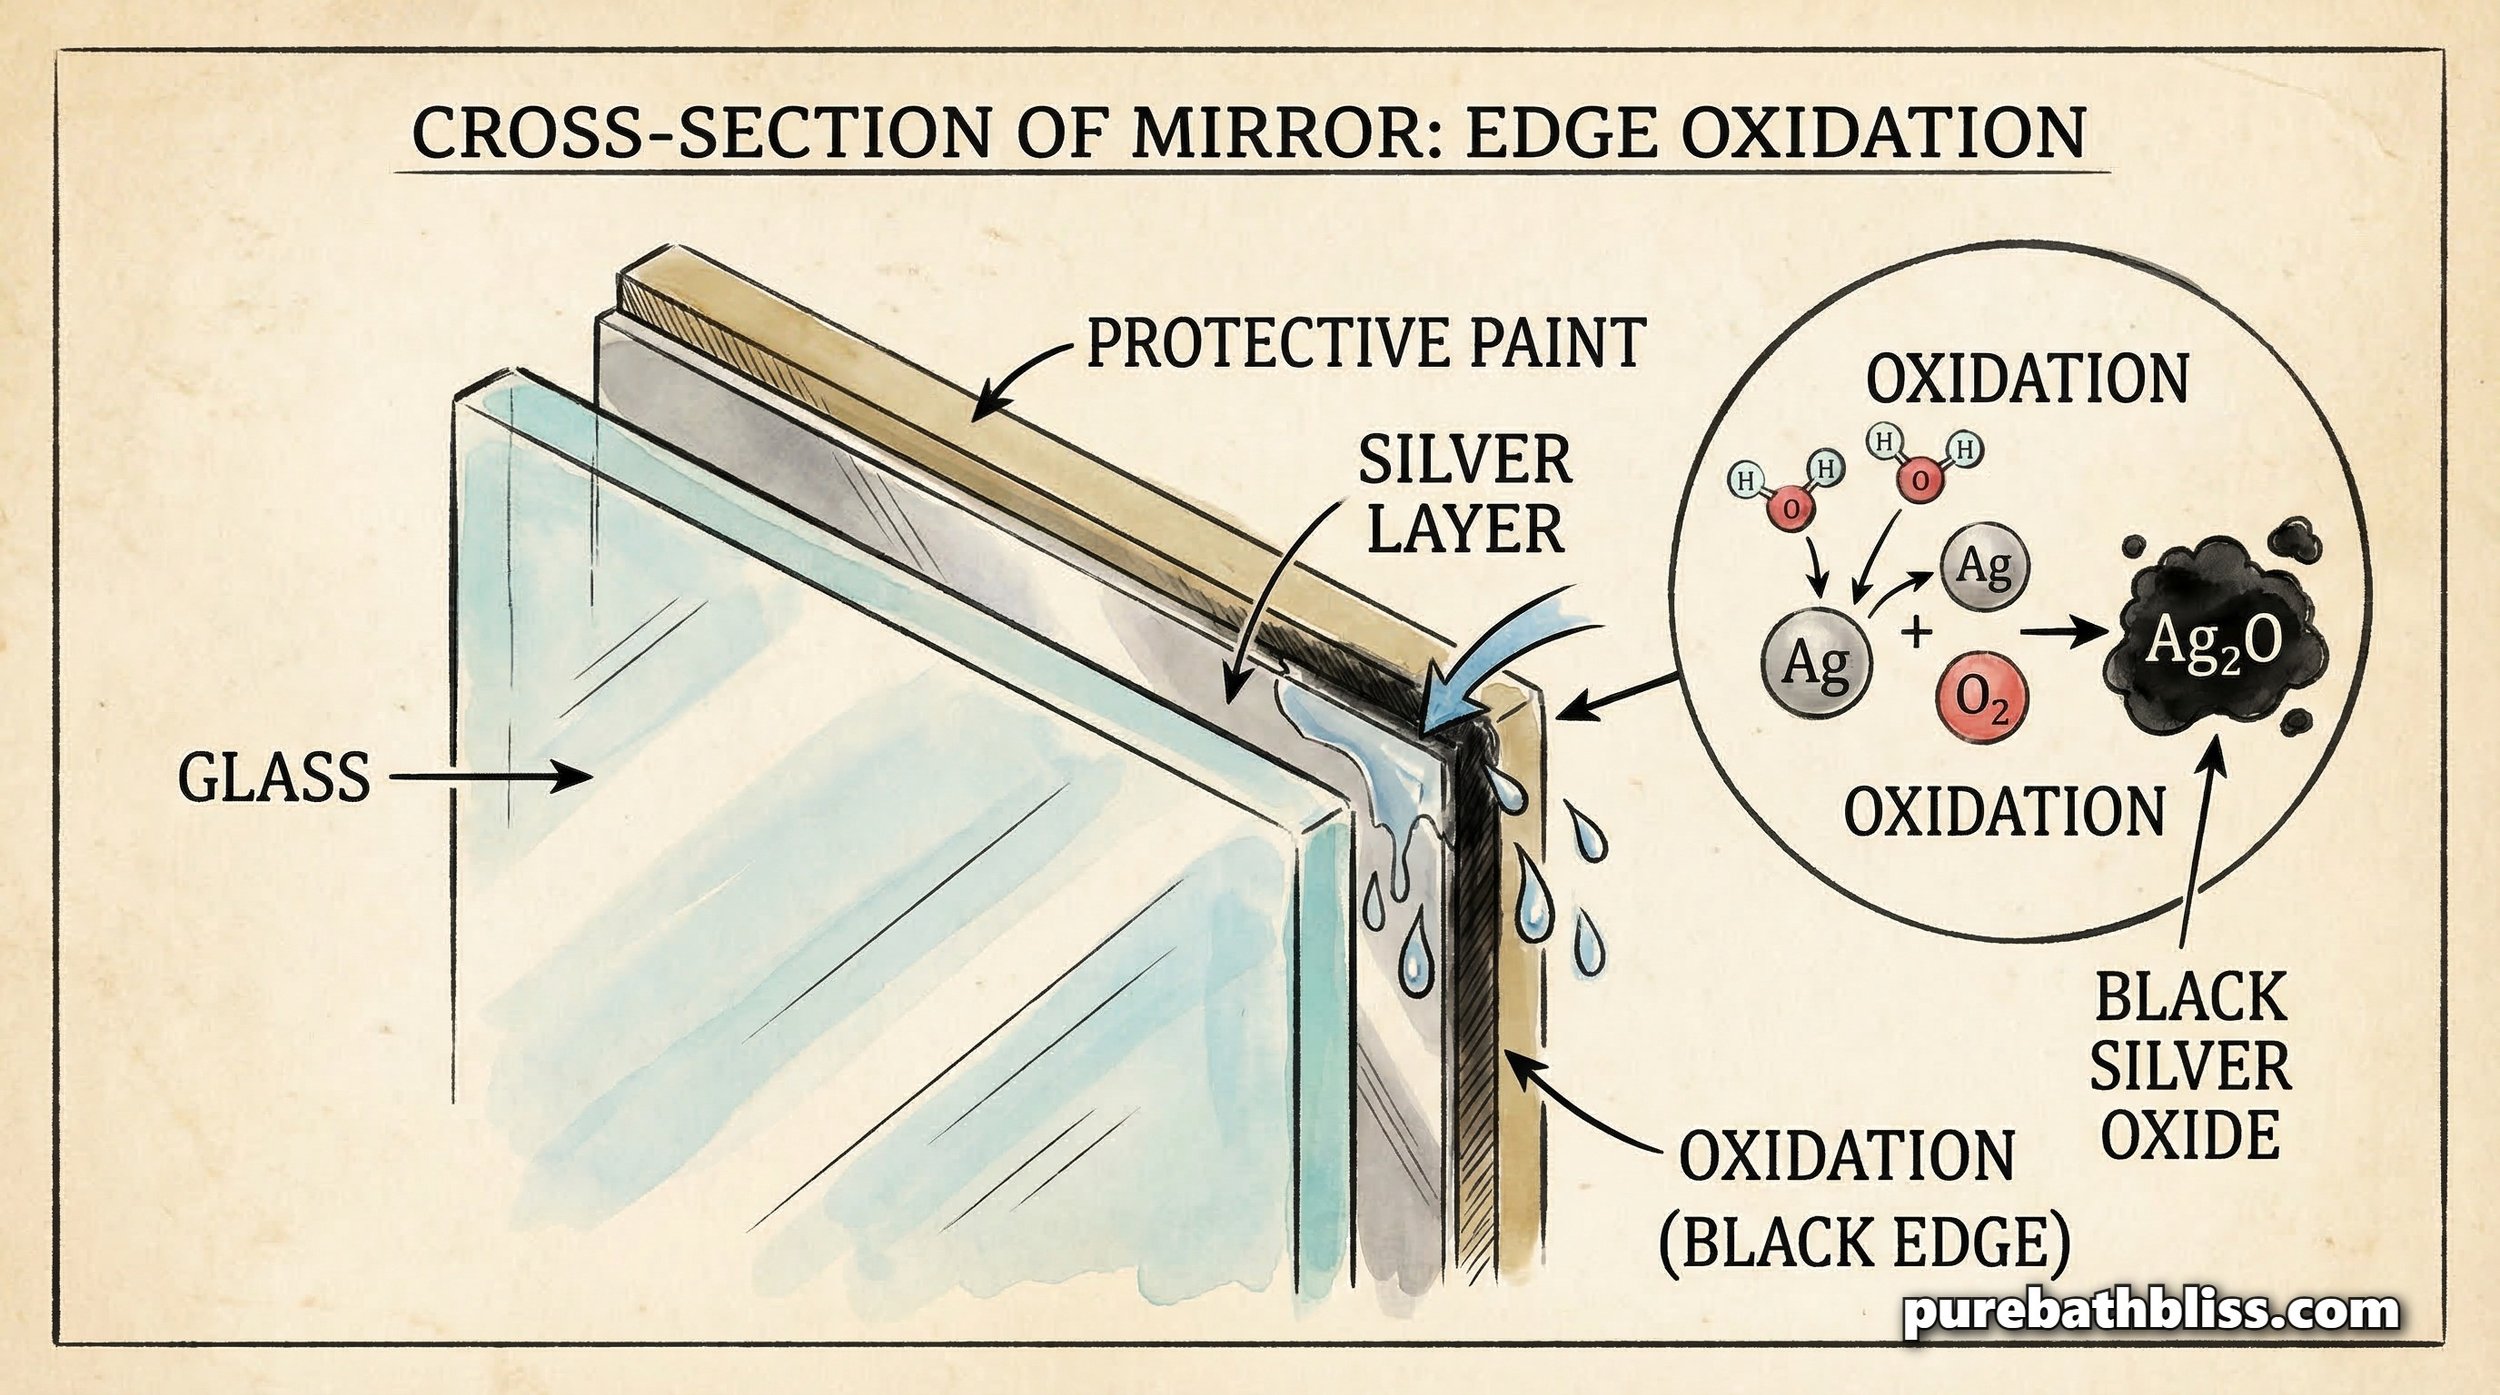
A mirror is essentially a piece of glass with a thin chemical layer of silver or aluminum bonded to the back, protected by several layers of specialized paint. When that protective "Infrastructure" fails, the silver layer oxidizes, much like a piece of silver jewelry tarnishing, and turns black.
While desilvering is often considered permanent, you don't always have to rip the mirror off the wall. By understanding why it happens and how to manage the moisture, you can stop the rot in its tracks or use a few professional tricks to hide the damage completely.

1. The Culprits: Moisture and Ammonia
The primary enemy of any bathroom mirror is moisture. Every time you take a hot shower, steam condenses on the cold surface of the glass. Gravity pulls that water down to the bottom edge, where it sits and eventually seeps into the microscopic gap between the glass and the protective backing.
However, the "silent killer" of mirrors is often the very product you use to clean them.
The Ammonia Trap: Many standard glass cleaners contain ammonia or vinegar. These are highly corrosive to the silver backing. If you spray the mirror directly and the liquid drips down into the bottom frame or clips, it eats through the paint and attacks the silver from the inside.
The Pro-Tip: This is why we always recommend a non-toxic bathroom cleaning routine. Use a pH-neutral cleaner and always spray it onto a microfiber cloth first, never directly on the glass.
2. Managing the "Soot Zone" of Humidity
If your mirror is desilvering faster than usual, your ventilation is likely failing. Stagnant, humid air is the fastest way to ruin your "internal infrastructure."
The Exhaust Factor: Your bathroom fan should be running during every shower and for at least 15 minutes after. If you've noticed the steam lingering longer than it used to, check if your bathroom fan is vibrating or clogged with dust.
The Air Gap: Higher-end installations leave a 1/4-inch gap between the mirror and the wall to allow for airflow. If your mirror is glued flat against the drywall, moisture gets trapped behind it with nowhere to go.
3. Professional DIY Fixes for Black Edges
Once a mirror has started to desilver, you cannot "rub out" the black spots. However, you can hide them or slow the spread.
Apply an Edge Sealer: If the damage is just starting, you can apply a clear Mirror Edge Sealer or even a thin bead of clear silicone along the perimeter. This creates a waterproof "Infrastructure" that prevents further moisture from reaching the silvering.
The Frame-Over Method: This is the most popular way to save an expensive mirror. You can purchase a "MirrorMate" kit or build your own frame using moisture-resistant trim. By gluing the frame directly to the glass, you hide the black edges and give the bathroom a high-end, 2026 design trend look.
Aluminum Foil Hack: For tiny spots in the middle of the glass, some DIYers have luck taping a small, smooth piece of aluminum foil to the back of the mirror. It’s not a perfect reflection, but it can mask the dark void from a distance.
4. When is it Time for Replacement?
If the desilvering has moved more than two inches into the center of the glass, or if the "Mirror Rot" is accompanied by a hazy, brown film (known as "foxing"), the mirror is reaching its end-of-life.
When choosing a replacement, look for "Copper-Free" mirrors. Modern high-quality mirrors use a copper-free backing that is significantly more resistant to corrosion in humid environments. It might cost $20 more, but it will last 15–20 years instead of five. This is the same long-term thinking we apply to recaulking a tub properly, spend a little more on the materials now to avoid the headache later.
5. Protecting Your New Investment
If you’ve just installed a new mirror in one of the latest 2026 sink colors, you want to protect it from day one.
Wipe the Bottom Edge: After every shower, take 5 seconds to wipe the bottom edge of the mirror where water collects.
Use a Defogger: Consider installing a Electric Mirror Defogger Pad behind the glass. These pads keep the glass just warm enough to prevent condensation from forming in the first place, effectively eliminating the primary cause of desilvering.
Summary: The Mirror Maintenance Checklist
Change Your Cleaning Habits: Spray the cloth, not the glass, and avoid ammonia.
Boost Your Ventilation: Ensure your exhaust fan is clearing the room within 15 minutes.
Wipe the Edges: Don't let condensation sit at the bottom of the mirror.
Seal the Perimeter: Use a specialized edge sealer to block moisture.
Frame the Damage: Cover existing black spots with a stylish, moisture-resistant frame.
Upgrade the Glass: When replacing, insist on copper-free "anti-desilvering" mirrors.
Mirror desilvering is a natural part of a bathroom's aging process, but it isn't inevitable. By managing the humidity and being mindful of your cleaning products, you can keep your reflection clear and your bathroom looking professional for years to come.