DIY Zero-Waste Toilet Bombs That Dissolve Grime (And Smell Like a Spa)
Transparency Note: We independently select storage solutions based on durability and hygiene. If you buy through our links, we may earn a commission.
Last updated: June 2026
I'll be honest about how this started. A few years ago I was standing in the cleaning aisle at the grocery store, staring at a plastic jug of blue toilet cleaner, doing the math. Six dollars a bottle, roughly two bottles a month across four bathrooms, twelve plastic jugs a year heading to a landfill. And I hadn't even thought about what was actually in the stuff, synthetic fragrance, hydrochloric acid, bleach derivatives. We were pouring that into our toilets and flushing it into the water system every single week.
I put the jug back and went home and started experimenting. What I landed on were these toilet cleaning bombs, small, dense little tablets made from baking soda and citric acid with essential oils pressed into them. You drop one in the bowl, it fizzes for a few minutes, you give it a light brush, and you flush. The toilet comes out genuinely clean, smells incredible, and the whole thing cost me about eighteen cents.
I've been making them ever since. One batch takes about twenty minutes and makes twenty-four bombs, roughly a month's supply for our household. Here's exactly how to make them.bombs, small,
Why These Actually Work
Before we get into the recipe, it's worth understanding the chemistry, because that's what separates a toilet bomb that genuinely cleans from one that just fizzes and smells nice.
The fizzing reaction you see when the bomb hits the water is baking soda (sodium bicarbonate) reacting with citric acid in the presence of water. That reaction produces carbon dioxide bubbles, which mechanically agitate the surface of the bowl and help lift grime. But the cleaning work is mostly chemical. Citric acid is highly effective at dissolving the calcium and magnesium mineral deposits that cause toilet bowl rings and limescale buildup. Baking soda is a mild abrasive and a powerful deodorizer. Tea tree oil is genuinely antibacterial and antifungal, not just fragrant. Lavender is antimicrobial as well and does double duty as the scent.
What you're replacing when you make these is a product that uses hydrochloric acid and bleach to do essentially the same job, dissolve mineral deposits and kill bacteria. The difference is that these ingredients are biodegradable, septic-safe, and don't off-gas toxic fumes in an enclosed bathroom. We talk a lot about indoor air quality on this site, and the bathroom is one of the worst offenders when it comes to chemical exposure. Switching your toilet cleaner is one of the easiest wins you can make. For more on that, our guide to white vinegar as a bathroom cleaner covers the same non-toxic chemistry in a different application.
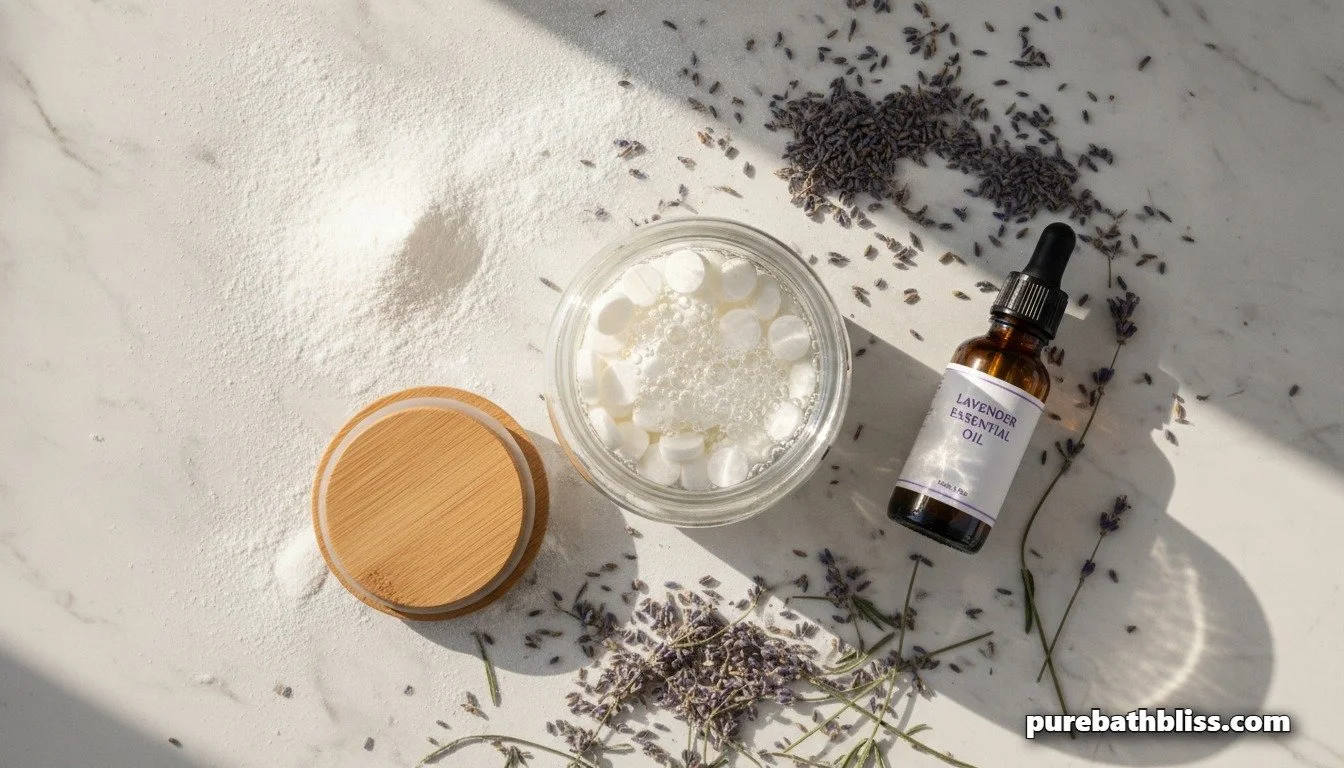
What You Need

Ingredients (makes 24 bombs):
2 cups baking soda
⅔ cup food-grade citric acid
30 drops lavender essential oil
20 drops tea tree essential oil
1 tablespoon dried lavender buds (optional, adds texture and a little extra scrubbing action)
Witch hazel in a small spray bottle
Tools:
A large glass or stainless steel mixing bowl
A silicone mold, mini muffin trays, ice cube trays, or small round sphere molds all work well
Measuring cups and spoons
Rubber gloves (citric acid is mild but can irritate skin with prolonged contact)
An airtight glass jar for storage
A quick note on citric acid: buy it in bulk. A 5 lb bag costs around $8 and lasts the better part of a year for this recipe. You can find it in the canning aisle at most grocery stores, or easily on Amazon. The food-grade citric acid in bulk brings the cost per bomb down to well under twenty cents.
How to Make Them
The whole process takes about twenty minutes of active time plus an overnight cure. Here's exactly what to do.
Step 1 — Mix the dry ingredients
Combine the baking soda, citric acid, and dried lavender buds in your large mixing bowl. Whisk them together until the mixture is uniform with no clumps. It should look and feel like fine powder. Do this step slowly, if you're too vigorous, the friction can cause a very small premature reaction with any moisture in the air. It won't ruin the batch, but you'll lose a little fizzing power.
Step 2 — Add the essential oils
Drip the lavender and tea tree oils directly into the dry mixture. Stir immediately and thoroughly. The mixture will clump slightly around where each drop lands, just keep stirring and it will incorporate evenly. This is the step where your kitchen starts to smell incredible.
Step 3 — Bind with witch hazel
This is the trickiest part of the process. You need to add just enough liquid to bind the mixture without triggering the fizzing reaction. That's why witch hazel works better than water here, it's mostly alcohol, which binds the mixture without causing an immediate acid-base reaction.
Spritz the witch hazel one or two sprays at a time, stirring between each addition. You're looking for a texture like slightly damp sand, it should hold its shape when you squeeze a handful but crumble if you poke it. If you overshoot and it starts fizzing in the bowl, don't panic. Work quickly to get it into the molds before it loses too much of its fizzing power. If it's too dry and crumbly, one more spritz usually fixes it.
Step 4 — Press into molds

Pack the mixture firmly into your silicone mold cavities. Press down hard — the firmer the pack, the better the bomb holds together. Overfill each cavity slightly, then scrape it flat with a butter knife or the edge of a spatula. If the mixture starts crumbling as you pack it, it's a touch too dry, mist once more and try again.
Step 5 — Cure overnight
Place the filled mold on a baking sheet and leave it somewhere dry and warm to cure for at least eight hours, overnight is ideal. Do not put it in the bathroom while it cures. The humidity will trigger the reaction and you'll end up with a mold full of flat, pre-fizzed powder. A kitchen counter or a shelf in a dry cupboard works perfectly.
Step 6 — Unmold and store
Once fully cured, flex the silicone mold gently to release the bombs. They should pop out cleanly and feel hard and dense. Store them in an airtight glass jar kept somewhere dry, not in the bathroom where humidity can degrade them over time. Properly stored, they keep for three to four months.
How to Use Them
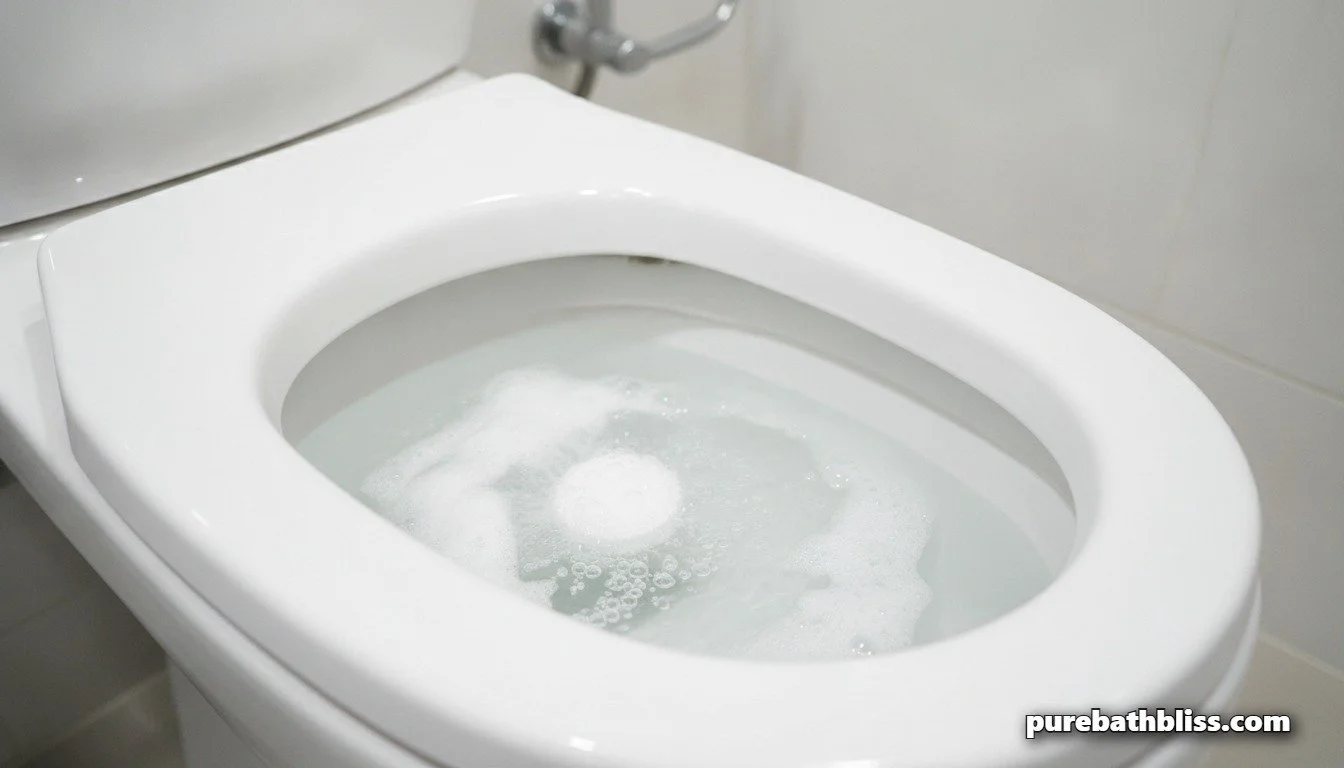
Drop one bomb into the toilet bowl, no need to empty the water first. Let it fizz for five to ten minutes. You'll see the citric acid working on any mineral deposits as the fizzing concentrates around the waterline. Give the bowl a light scrub with your toilet brush while it's still fizzing, then flush. That's it.
For stubborn rings or heavy limescale buildup, drop two bombs and let them sit for thirty minutes before brushing. The extended contact time makes a noticeable difference on older staining.
I use one bomb per toilet about twice a week as part of a regular cleaning routine. At that cadence, a batch of twenty-four lasts our family of six about three weeks across three bathrooms. It's become one of those things I just make on a Sunday afternoon without thinking much about it.
Variations Worth Trying
Citrus Zinger
Swap the lavender and tea tree for 30 drops of sweet orange essential oil, 20 drops of lemon essential oil, and a tablespoon of dried orange zest. Same method, same ratios. The smell is bright and energizing rather than calming, a good option for a kids' bathroom or a morning routine.
Extra Disinfecting Boost
Add one teaspoon of 3% hydrogen peroxide to the mixture at the witch hazel stage. Hydrogen peroxide is a broad-spectrum disinfectant that breaks down into water and oxygen, leaving no toxic residue. We cover hydrogen peroxide as a cleaning agent in our guide to cleaning bathroom floors with hydrogen peroxide, and the same chemistry applies here.
Gift Jar Version
Pack a small Weck jar with a dozen bombs, tie a piece of jute around the lid, and add a handwritten tag with instructions. These make genuinely thoughtful gifts for anyone trying to reduce their household chemical use. I've given these to neighbors, and they always ask for more.
Troubleshooting
Bombs are crumbly and won't hold shape: The mixture is too dry. Add one more spritz of witch hazel, mix thoroughly, and repack the molds immediately.
No fizzing reaction when dropped in the bowl: Your citric acid may be old or has absorbed moisture. Test it by dropping a pinch into a small amount of white vinegar, it should fizz vigorously. If it doesn't, replace the citric acid.
Mixture starts fizzing in the bowl before you can mold it: You added the witch hazel too quickly or used too much. Work faster next time and add liquid in smaller increments. The bombs will still work, they'll just have slightly less fizzing power.
Bombs stuck in the mold: Rub the inside of the mold cavities lightly with coconut oil before filling. They'll release cleanly every time.
The Real Win Here

The thing I've come to appreciate most about these isn't the cost savings, though those are real. It's that making them is an active choice. Every time I drop one in the bowl instead of reaching for a plastic jug of blue cleaner, that's a decision I've made deliberately about what comes into our home and what goes into our water system.
One batch prevents twelve plastic bottles from entering the waste stream over the course of a year. Multiply that across a household that also uses the right eco-friendly toilet brush and has already made the switch on toilet paper and cleaning products, and the cumulative impact is genuinely meaningful.
Drop one in tonight. See what you think. I'd be surprised if you go back to the plastic jug.